How to create your first calendar event
Calendar
Creating your first calendar event as an officer or chair of a fraternity or sorority can be a daunting task, let's learn how to nail it and become a pro at making calendar events.
Setup
To start creating your first event, you first need to get to the new event screen. To do this, go to the Calendar page, and click one of the two buttons to start making your event.
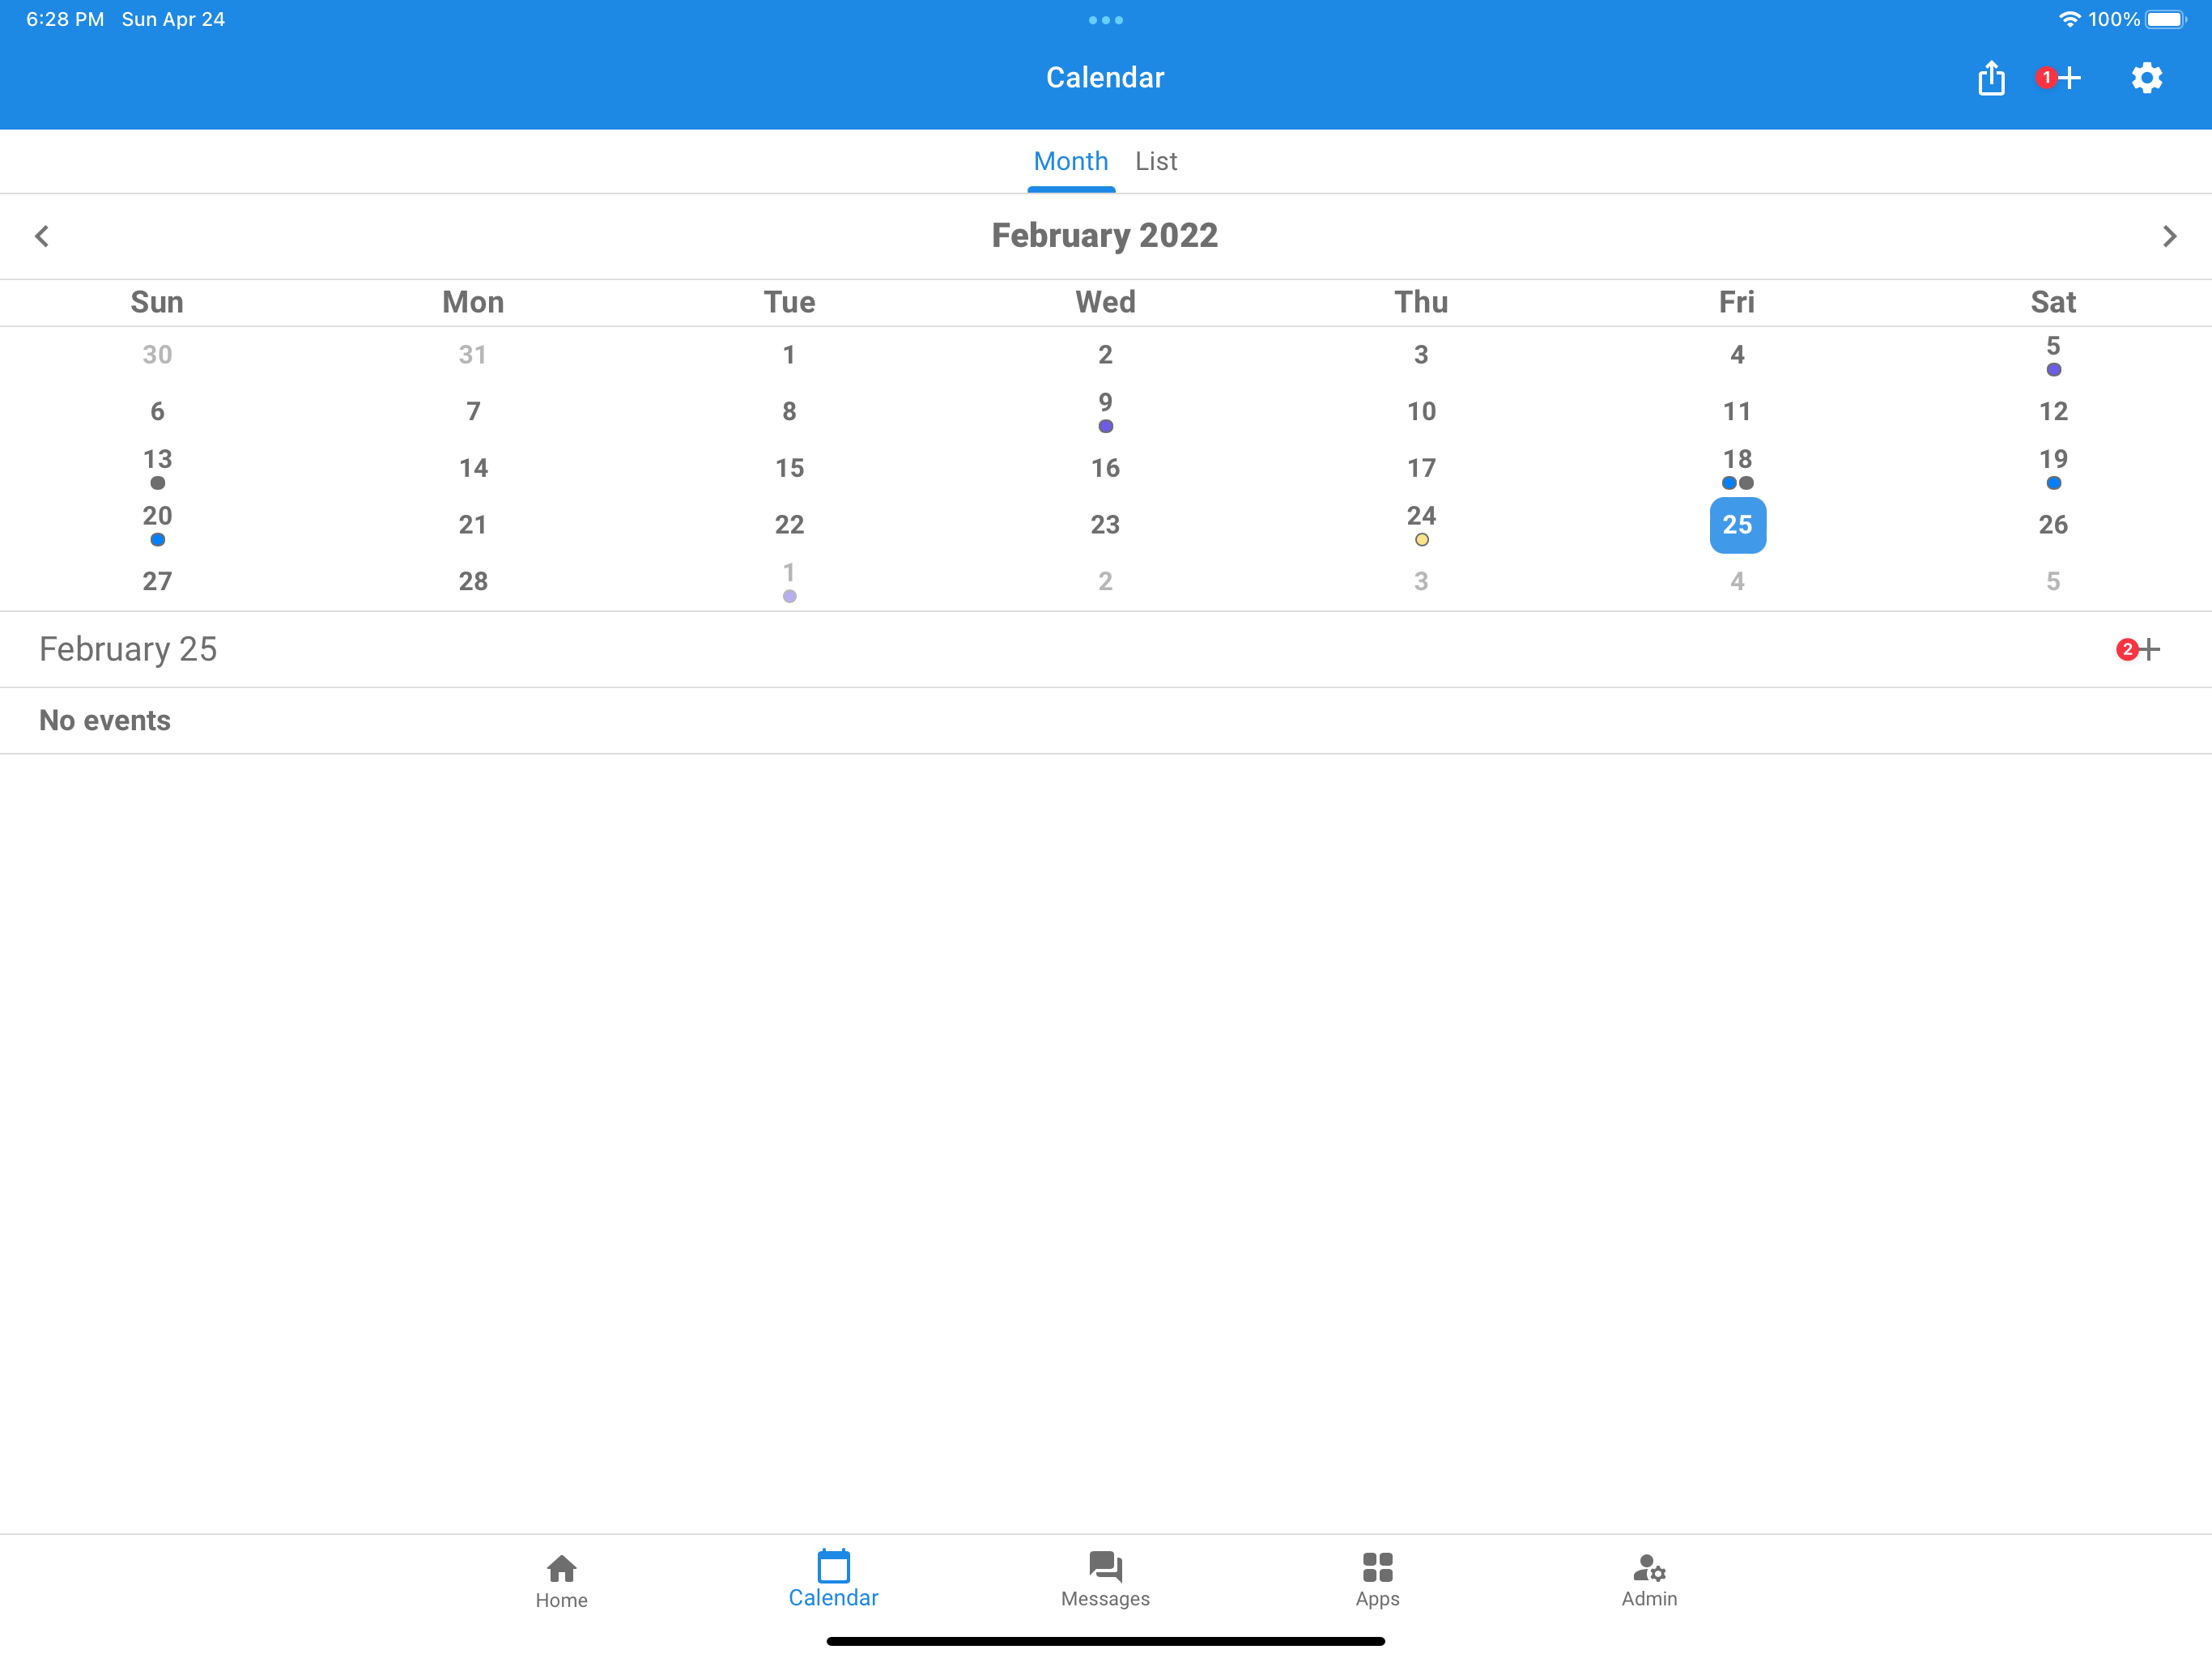
(1) Create a new event starting from the current date
(2) Create a new event starting from the selected calendar date
Event Details
Once you are at the new event screen, you can see all the details that you can modify regarding your future event.
Name, Timing, & Location
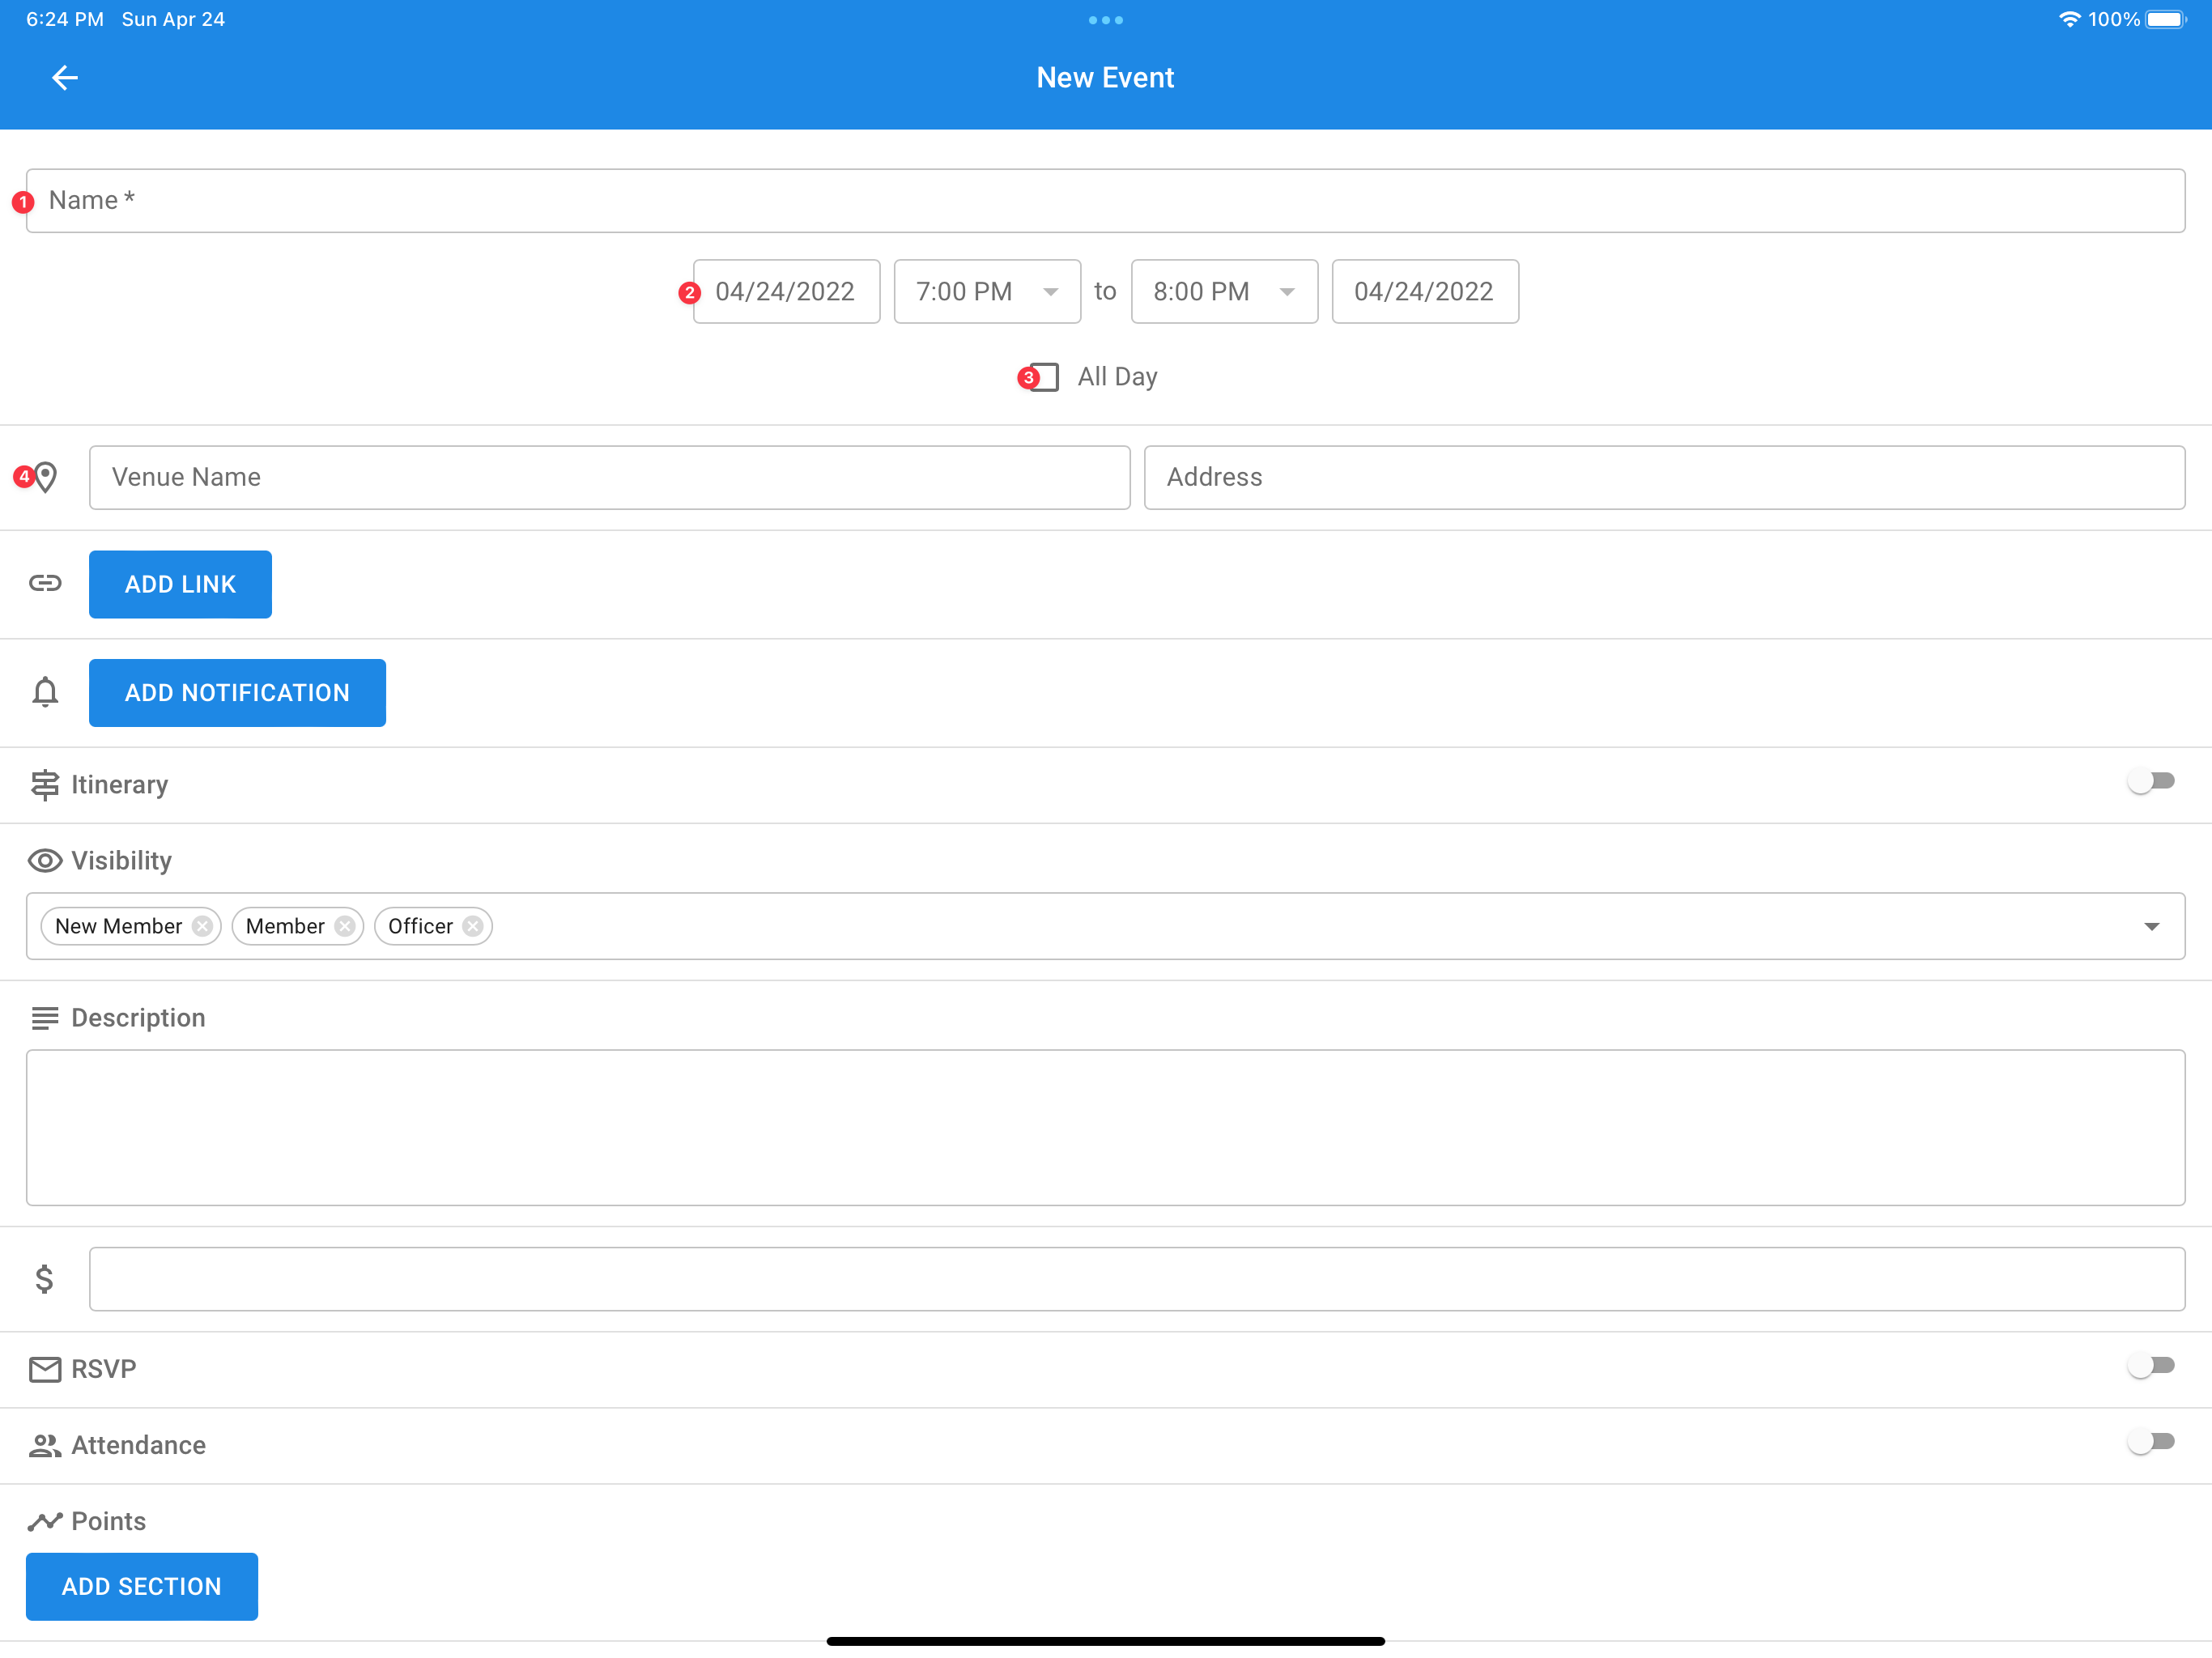
(1) Name
(2) Timing
(3) All Day
(4) Location
Your event timing can be set to have a start and end date plus either be marked as all day or have a start and end time (in 15 minute increments).
If your event lasts multiple days and does not have a specific start and end time, it's recommended that you use the all day functionality. Examples of this include weekend trips (formal, beach weekend, mountain weekend, etc.) or spring breaks.
The location of your event can be specified by the combination of the Venue Name and Address fields. The address field is provided to navigation apps when members click on the location, and the venue name is what is displayed to them. If no venue name is provided the address is displayed to members on the view event screen, and if no address is specified the location cannot be selected. If neither is selected nothing is shown to your members.
Links & Notifications
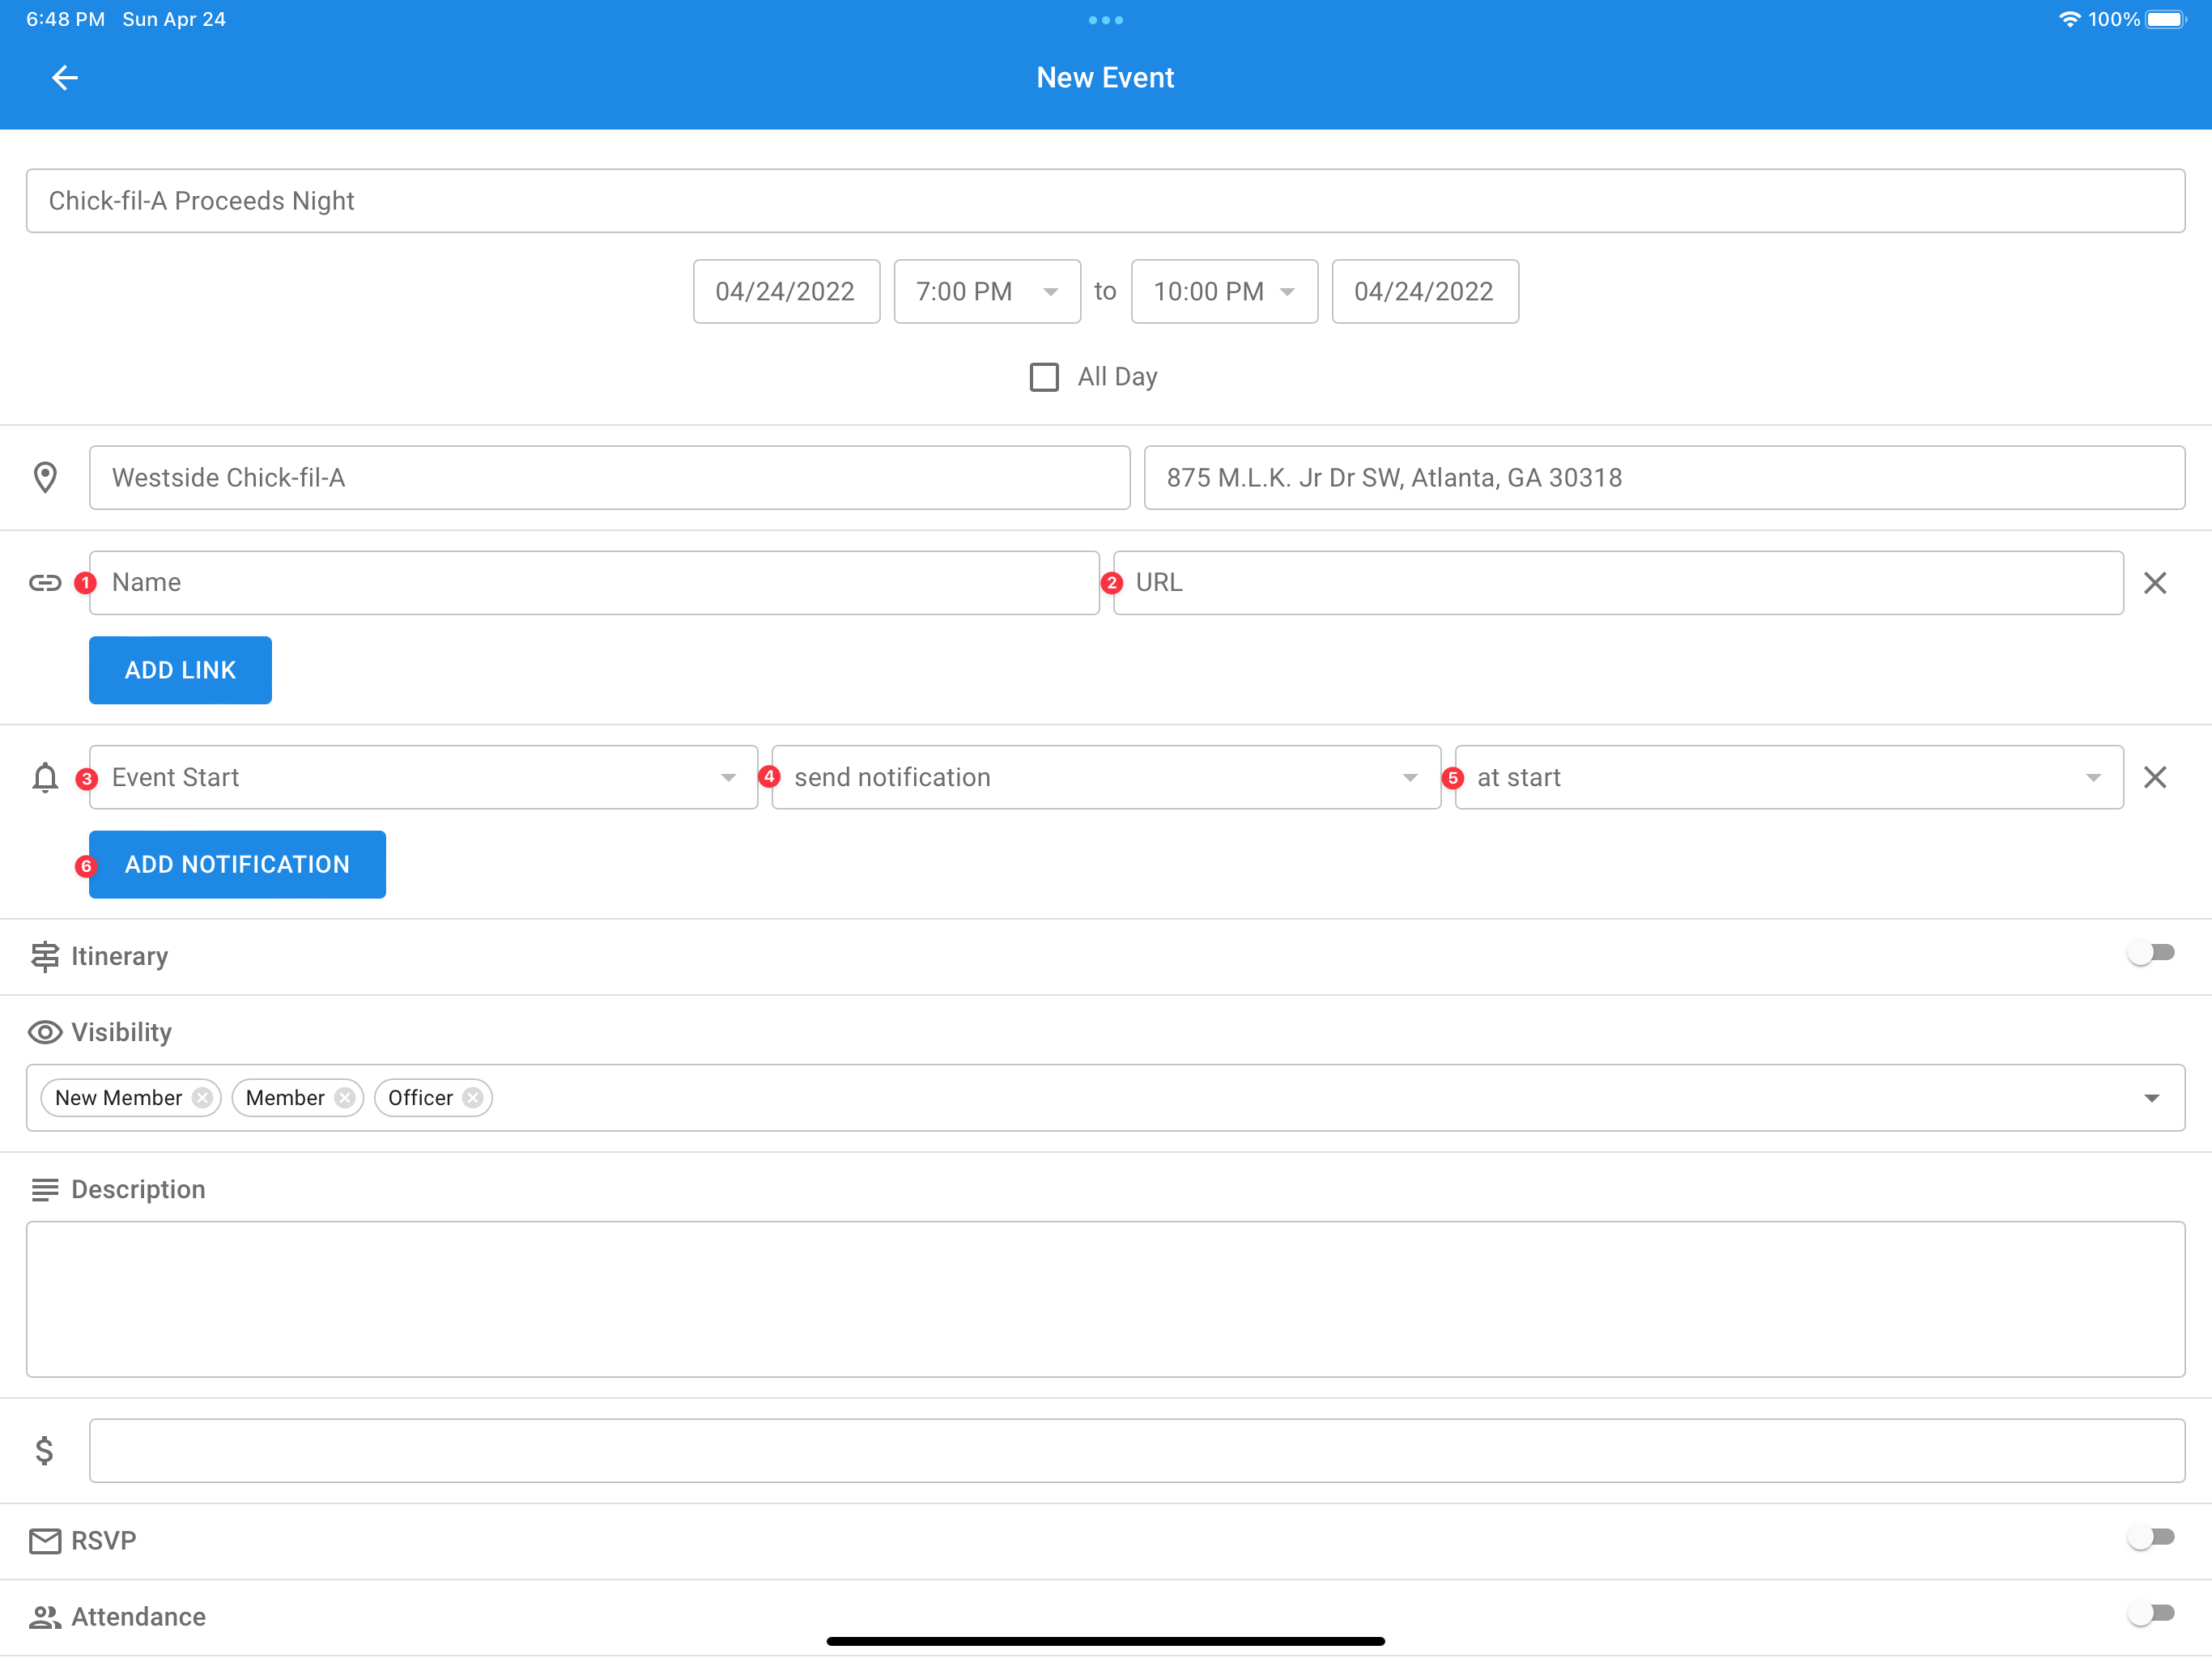
(1) Link name
(2) Link URL
(3) Notification type
(4) Notification medium
(5) Notification timing
(6) Add Notification
When adding links, you provide a name and url. While only the url is required, the name is displayed instead of the url to your members if provided, given them a better understanding of where the link will be headed. For example, if you have a link to a Google Drive file, you can specify the file's name in the name field.
There are three possible types of notifications for events: excuse deadline, sign in open, and event start. There is a limit of one notification per notification type, so be sure to utilize all types of the notifications for the best experience.
It is recommended to use the excuse deadline and sign in notifications every time your event has sign in or excuses enabled. This allows your members to be aware about upcoming deadlines regarding the event. It is only recommended to use the event start notification when all the members who are viewing the event have the opportunity to attend or experience the event.
For most chapters, all your notifications are sent solely over Android/iOS push notifications, so the notification medium select only has the one option.
Notification timing allows you to modify when the notification is sent relative to the type. For example, if you are sending an excuse deadline notification, you can set the notification to send at a certain point in time before the excuse deadline.
Itinerary
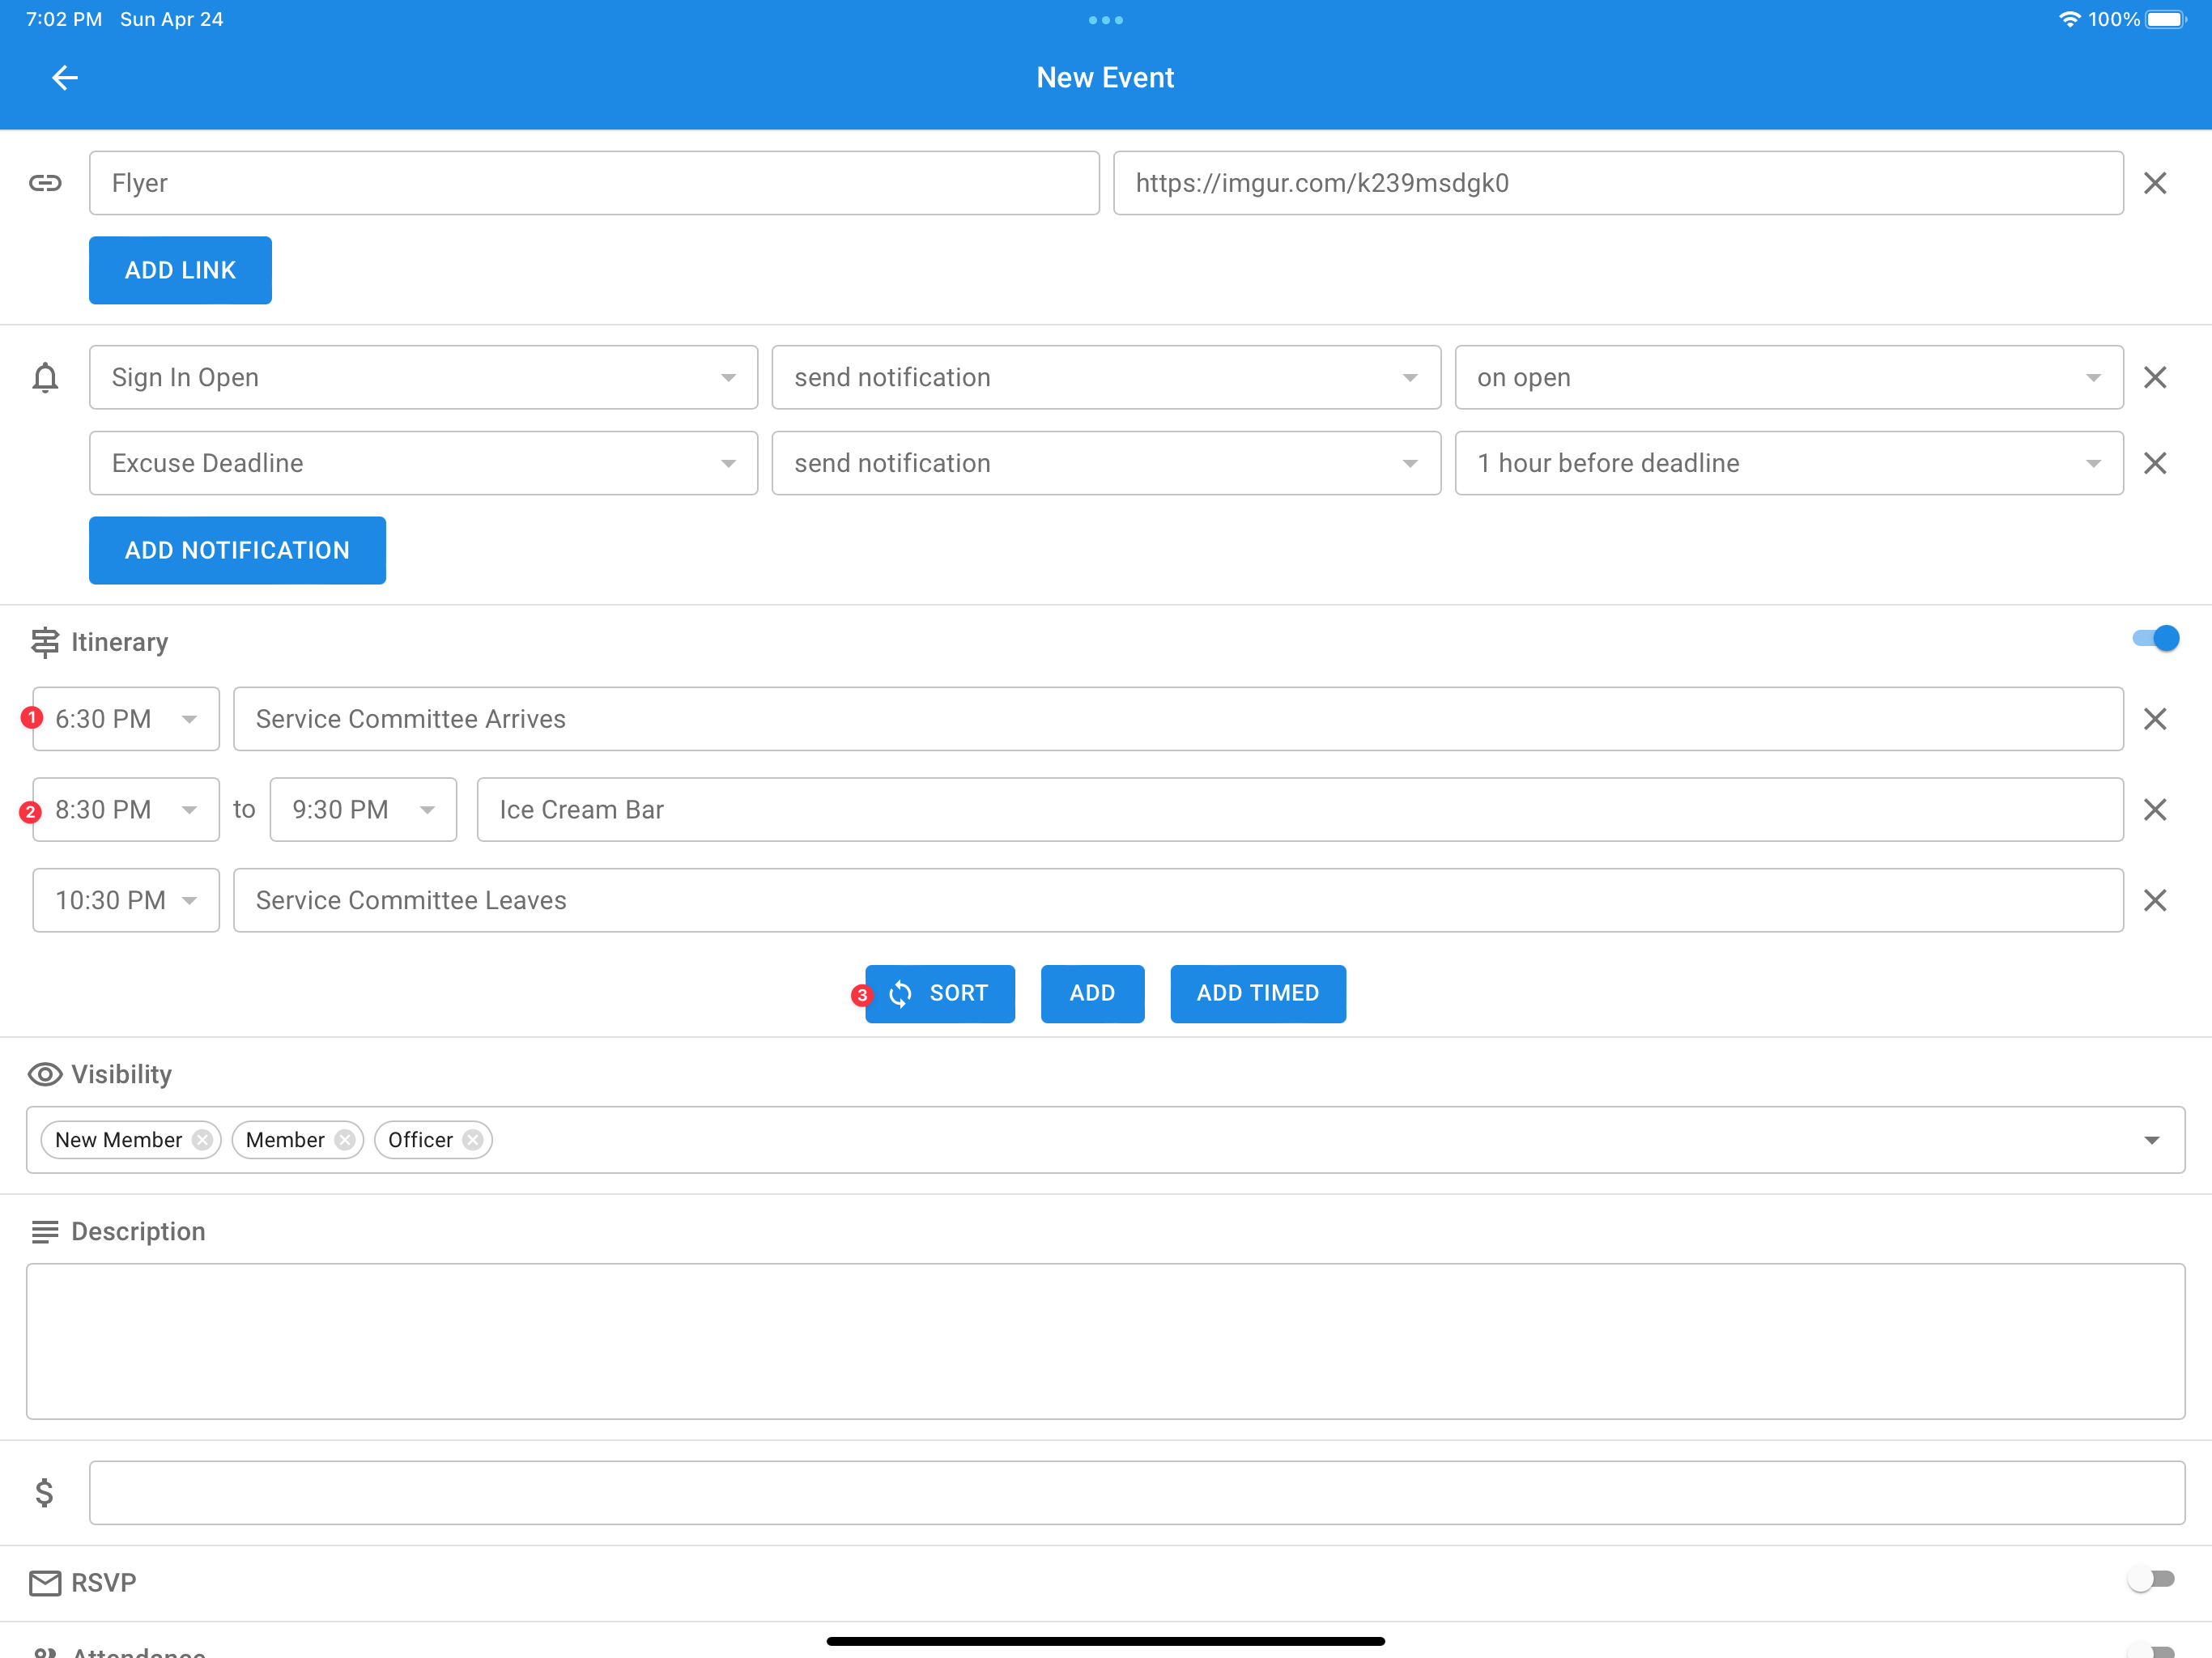
(1) Itinerary activity
(2) Timed itinerary activity
(3) Sort itinerary button
Itineraries are beneficial for complex events where multiple activities are going to be taken place. You can add regular itinerary activities and ones that have a start and stop time. If your event spans multiple days, you can also specify the day(s) for each activity.
If your add your activities in the wrong order chronologically, you can sort them by using the sort button.
Visibility
You can specify the different member statuses that have access to your event by using the visibility field. It can be used to hide secret events or to help prevent clutter in your members' calendars, by only showing them events that apply to them.
Description
You can add a description to your event to specify any details such as what activities will be taking place, what members should do once they arrive at the event, or what they should bring or wear.
Cost
You can specify a cost for the event that will be displayed to members who view the event. This field is only used as a descriptor, meaning that the cost is solely used to be displayed when viewing the event.
RSVP
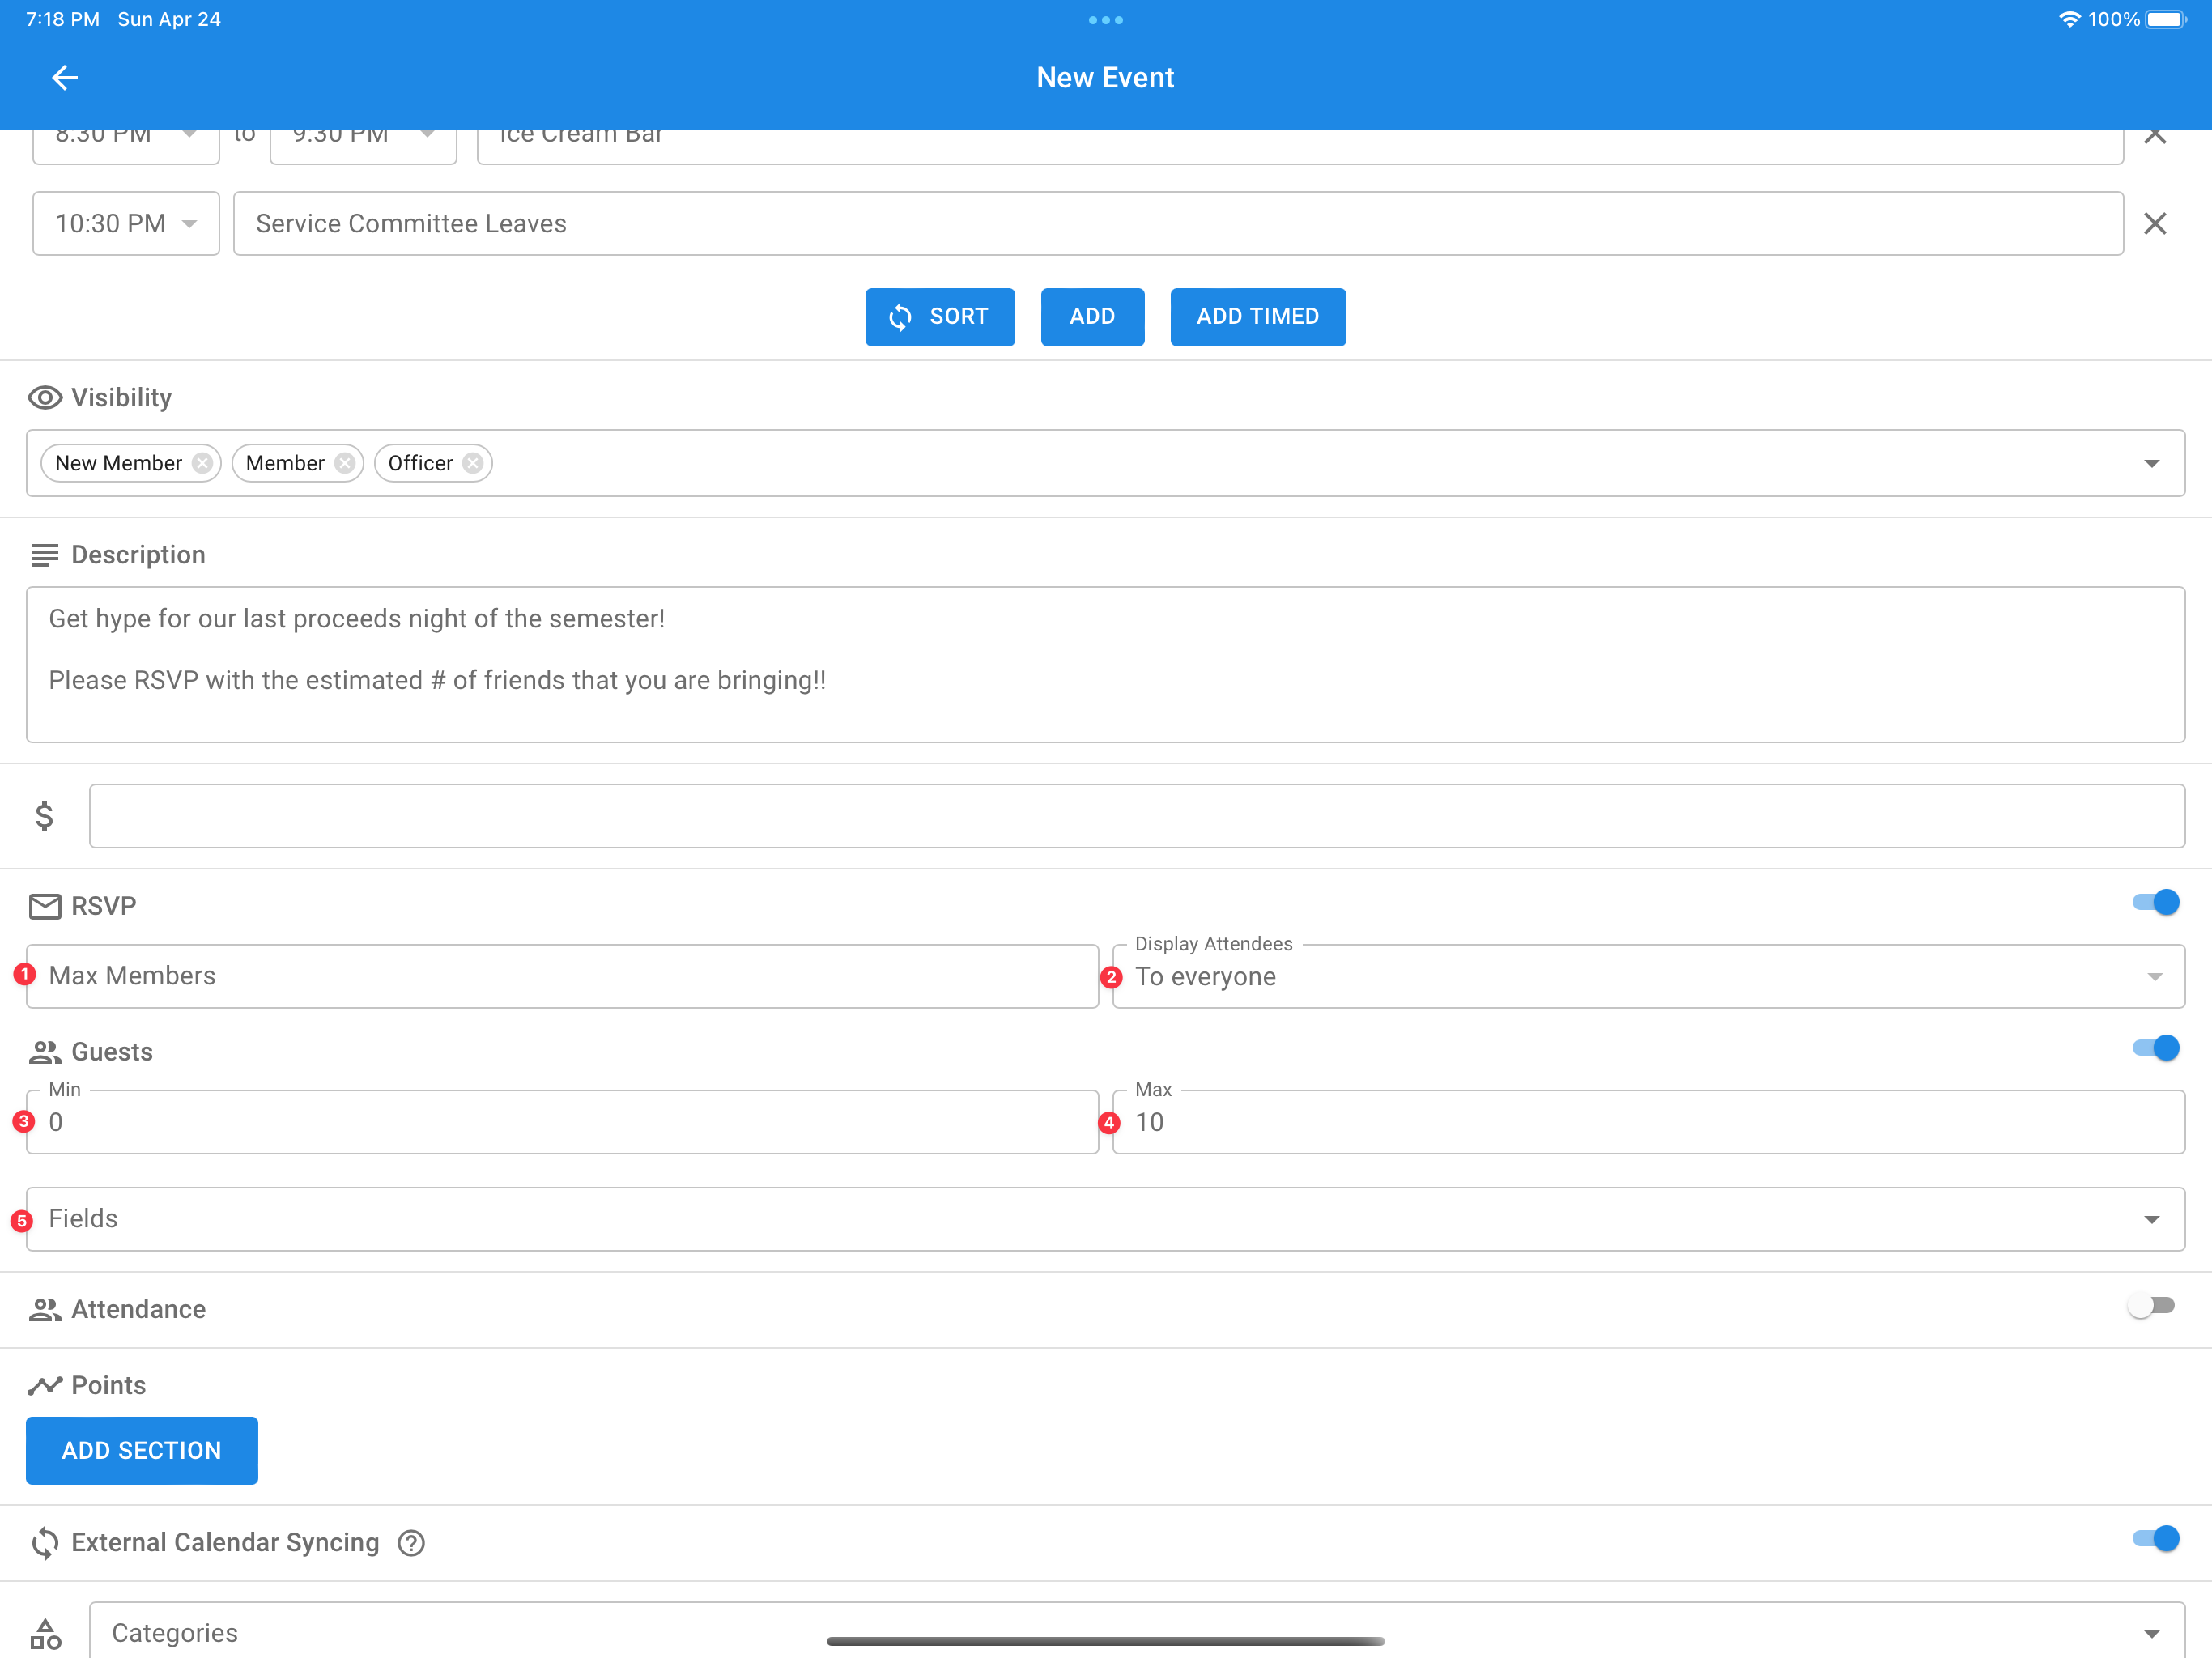
(1) Maximum number of members that can rsvp
(2) Who can see the rsvp list
(3) The minimum number of guests each rsvp'd member needs to bring
(4) The maximum number of guests each rsvp'd member is able to bring
(5) The fields associated with each guest
The rsvp feature is beneficial for optional sign up events such as date nights, formals, and workshops.
The max members field allows you to set a limit on how many members can sign up for the event. While it is not required, if set it will display to members when there are only a few spots remaining.
The display attendees field determines who can view the rsvp list for the event.
Guests can be enabled for the event to allow members to list guests that they are bringing to the event. You can set a minimum and maximum number of guests that each member can bring to the event (maximum of 10 allowed per member).
You can also set the fields that members must provide for each guest, including name, phone number, and email address. If no fields are selected then members will be asked to provide the number of guests that they will be bringing.
Attendance & Points
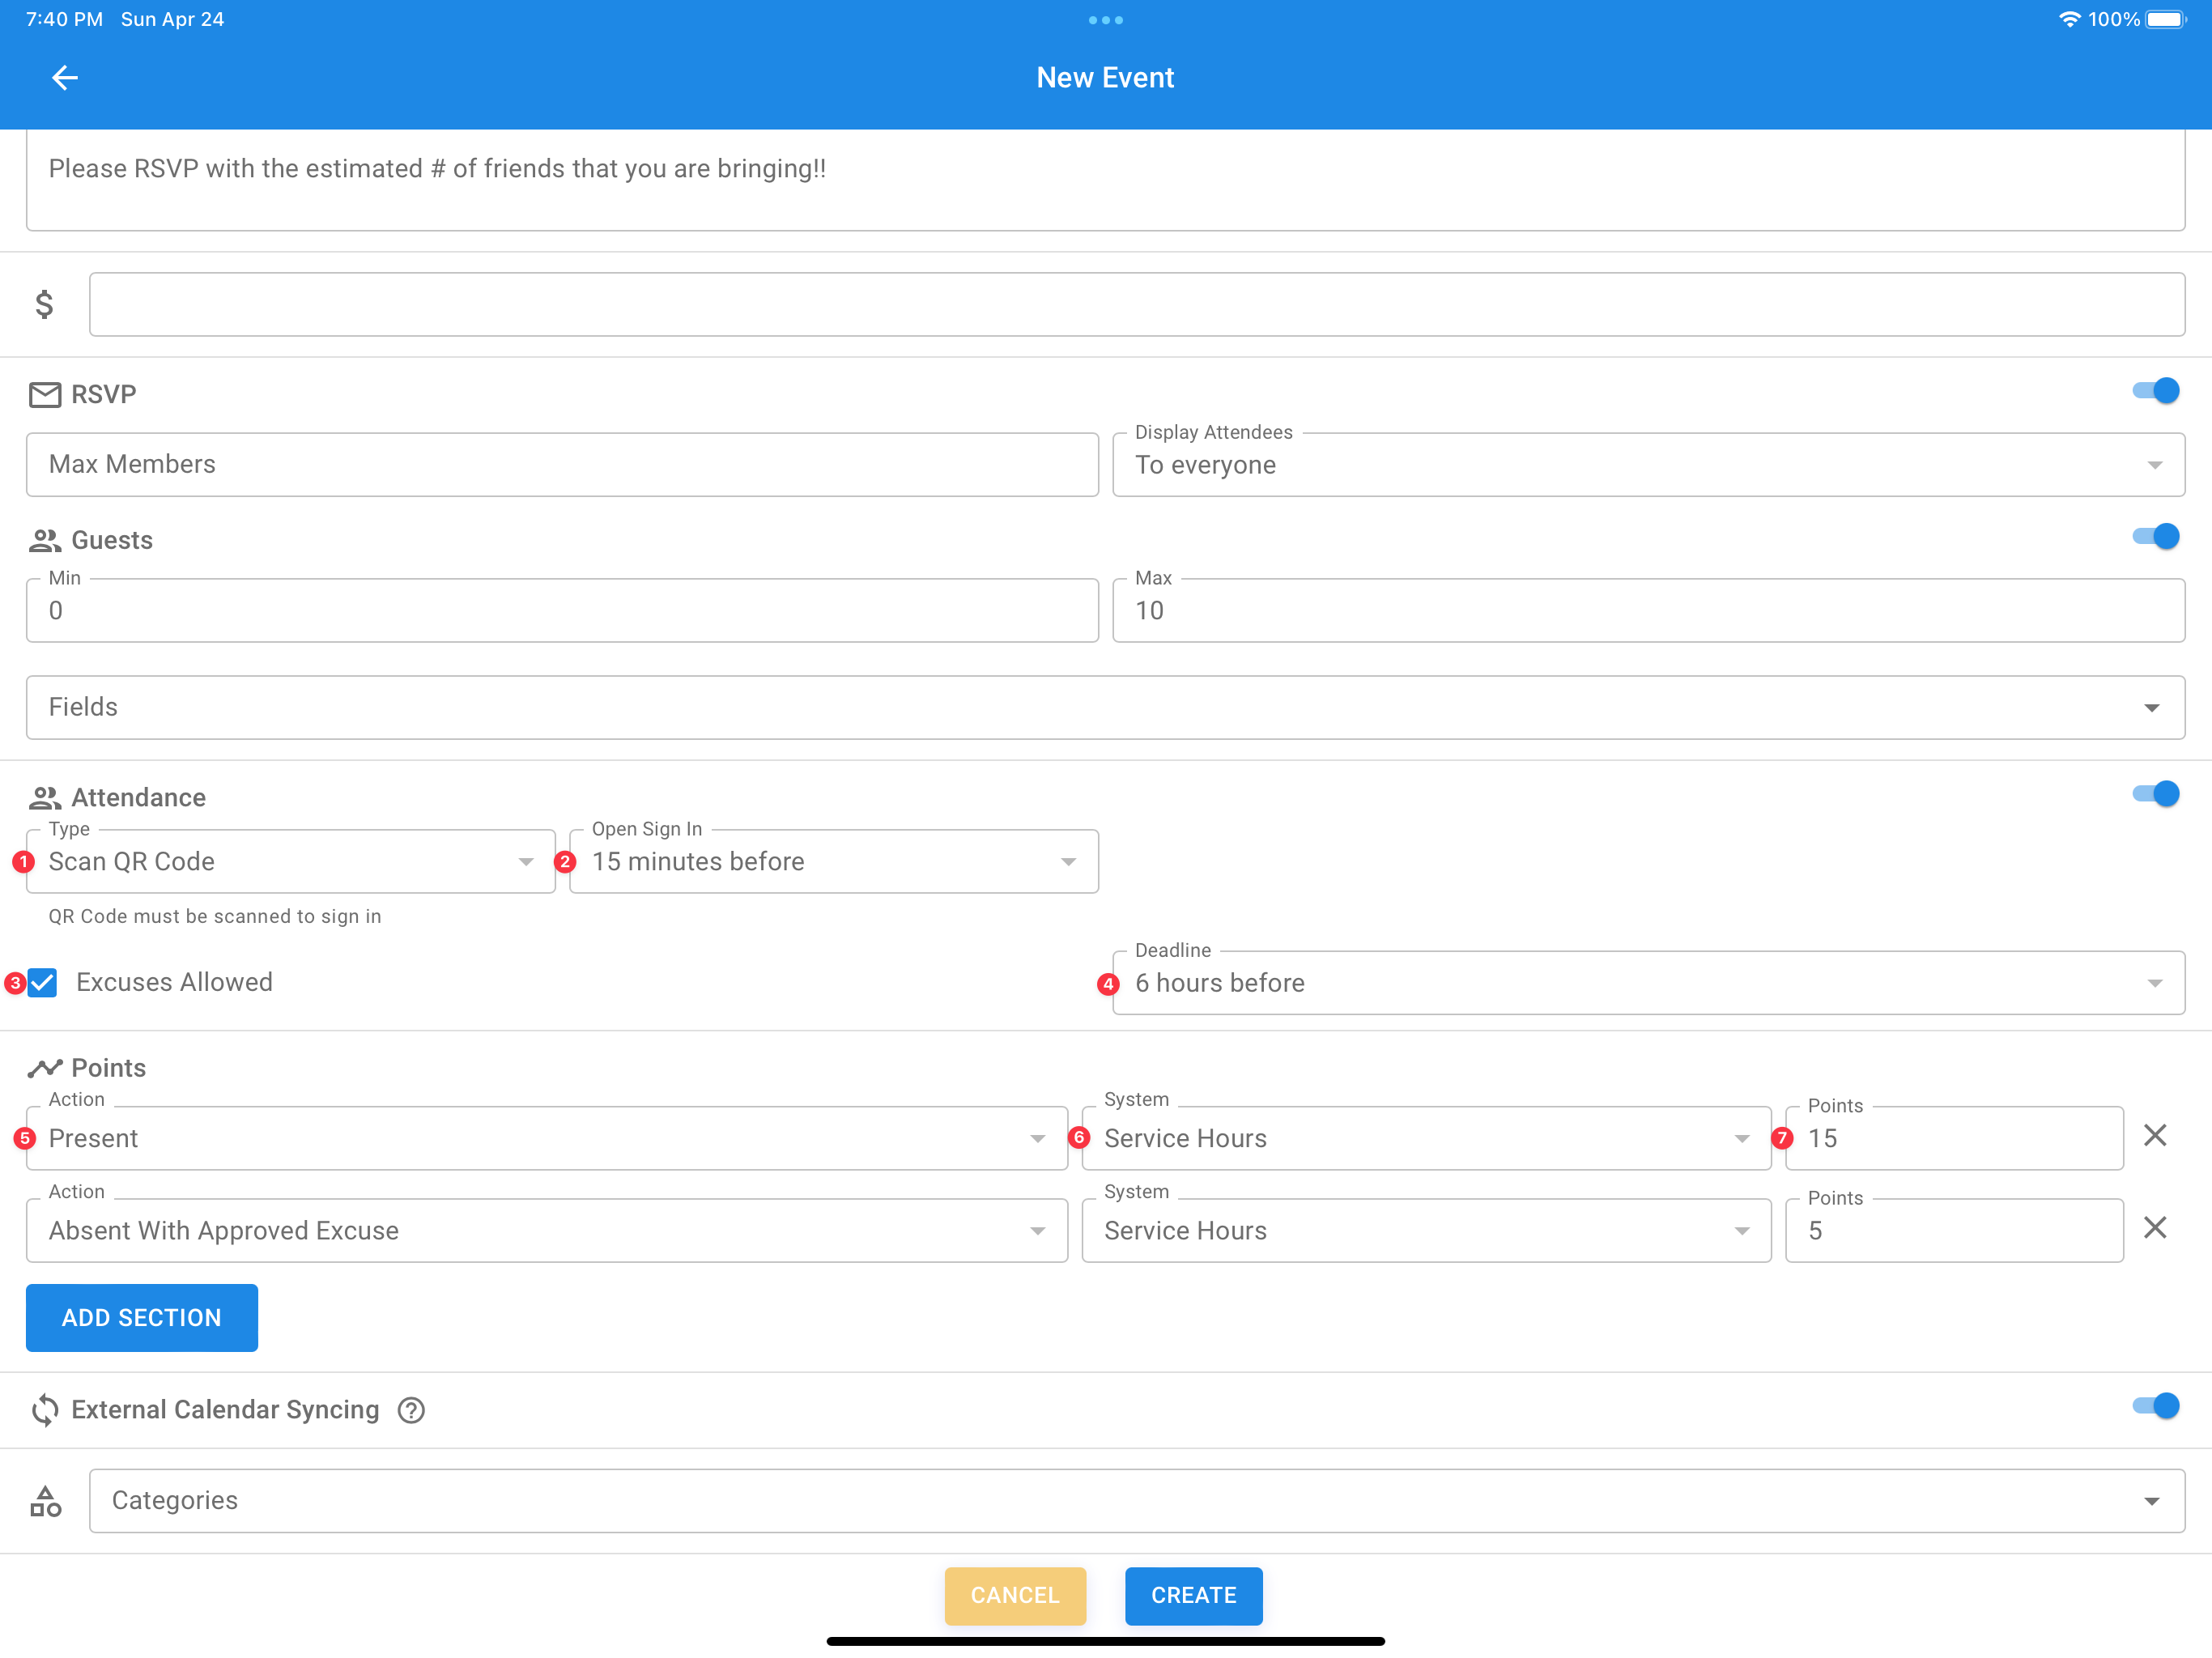
(1) Attendance type
(2) Sign in open time
(3) Excuses toggle
(4) Excuse deadline
(5) Point action
(6) Point system
(7) Point value
Sign In
You can enable attendance by switching the toggle at the top of the attendance section. Once enabled, users will be able to sign in to your event, in whatever manner you enable. You can facilitate sign in several different ways:
- No password - members click sign in while viewing the event and are automatically signed in
- Password - members must provide the password you input to be signed into the event
- Scan QR code - members must scan the QR code from their phone that admins can see while viewing the event
- Admin - members can only be signed in by admins (by name or qr scan)
- PIN - members must provide the auto generated pin that admins can see while viewing the event
PIN sign in is the recommended method in most cases as it is easy for members to recall. QR code scanning is the most secure method as it is difficult for members to aide others in signing in without being present, but can be difficult at times for members who are not technoligically adept.
You can also specify the time that the sign in opens relative to the event start time. This is useful for events like chapter, where it might be easier for officers to start signing in members before the event starts.
Excuses
Excuses can be utilized for when members are required to attend events but have the ability to opt out in certain circumstances. Members are able to submit reasoning for their excuse request and will be notified when their excuse gets approved or denied.
Points
You must create at least 1 point system before this feature is visible
You can provide points to members based on their actions. There are several actions that members can take that points can be provided for:
- Present
- Absent
- Absent without approved excuse
- Absent with approved excuse
- Approved excuse
- RSVP'd
Members can gain points for overlapping actions, such as getting points for having an approved excuse and being present. As such, you should be careful about what the actions are utilized. For example, if you are providing members points for being present at an event or having an approved excuse, you will most likely want to use the present and absent with approved excuse actions.
External Calendar Syncing
When external calendar syncing is enabled, members who have their calendar synced with other calendar services (such as Google Calendar or iCal), the event will show up there. It is recommended that this toggle is only turned on when the event applies to all members who are withing the appropriate visibility, so as to not clutter members' calendars.
Categories
You can add categories to your event for better organization. The first category selected is considered the primary one, and is used as the color indicator for the event. It is recommended to only use up to 2 or 3 categories per event.
Closing
Now that you have added all the appropriate fields to your event, it is time to click create! If you filled out the fields correctly, your event will be created and you will be taken to the view event screen. Your chapter representative will be able to assist you with any problems that you might have.
